
It’s a genuinely puzzling experience: some sockets in a room work perfectly fine while others, seemingly on the same wall or circuit, suddenly stop providing power. This article walks through the electrical logic behind this specific pattern, helping you understand what it typically means and how to approach diagnosing it.
Why This Pattern Is Actually a Useful Clue
The fact that some sockets work while others don’t is itself diagnostically valuable information, since it usually rules out certain causes (like a main breaker trip, which would affect an entire circuit uniformly) while pointing toward others (like a fault or break at a specific point along a radial circuit’s chain, as explained in our dedicated radial vs ring circuit article).
Most Likely Cause: A Break Partway Along a Radial Circuit
If your home uses radial circuit wiring, the standard approach in most Nigerian installations, sockets are connected in a chain, each one wired to the next. If a fault, loose connection, or break occurs at some point along that chain, every socket before the break continues working normally, while every socket after it loses power entirely. This explains the exact “some work, some don’t” pattern precisely, and understanding your circuit’s physical wiring sequence, which an electrician can trace, is often the fastest path to locating the fault.
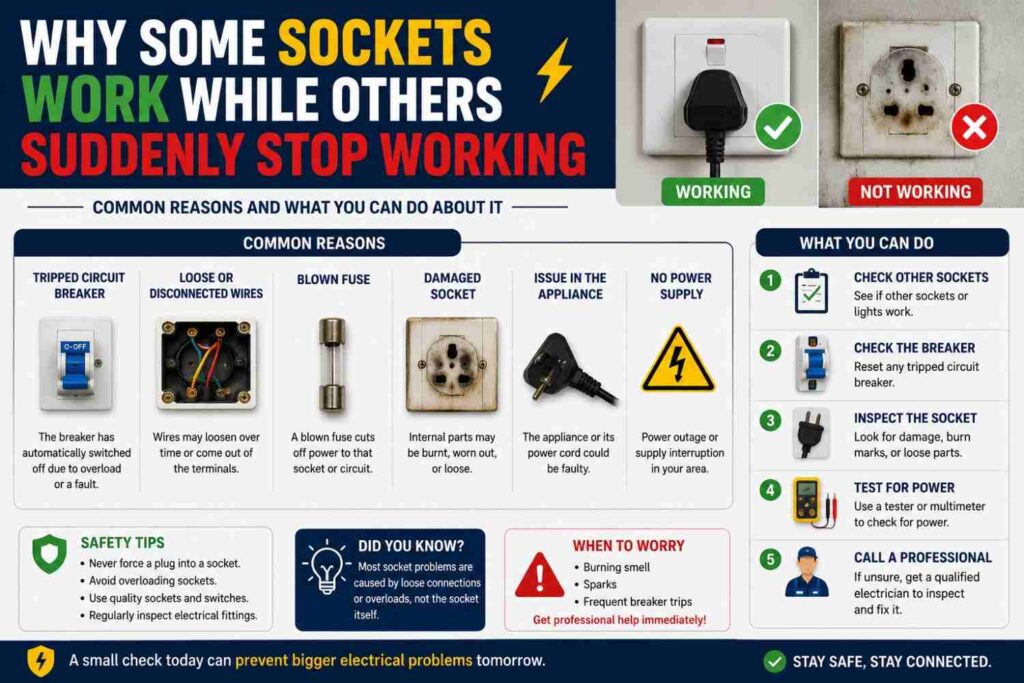
Other Possible Causes
- An individual socket has failed internally, due to worn contacts, a loose connection, or physical damage, while neighboring sockets on the same circuit remain unaffected.
- A local, secondary protective device has tripped, such as a spur-specific fuse or an RCD/RCBO protecting only a subset of sockets, if your installation uses individual circuit protection for different socket groups rather than one shared circuit.
- A socket was accidentally switched off at a nearby wall switch, in installations where individual or grouped sockets are switch-controlled, an easy-to-overlook possibility worth checking first.
- Water damage or corrosion affecting specific sockets more than others, particularly relevant near kitchens, bathrooms, or areas with past water exposure.
A Simple Troubleshooting Sequence
- Check the obvious first: Confirm the non-working sockets aren’t simply switched off at an adjacent wall switch, and that whatever was plugged in isn’t itself the problem (test with a different, known-working device).
- Check the distribution board: Look for any tripped breaker or RCD specifically associated with that area, even if other sockets on what you assume is “the same circuit” are still working, since your home’s circuit layout may not match your assumptions about which sockets share a circuit.
- Identify the pattern: Note exactly which sockets work and which don’t; if you can identify a physical sequence (for example, all non-working sockets are in one half of a room, or all past a certain point), this is valuable information for an electrician.
- Call a qualified electrician to trace the circuit and locate the specific break or fault, rather than attempting to open sockets or wiring yourself.
Why This Shouldn’t Be Ignored, Even If Inconvenient Rather Than Dangerous
While a socket simply not providing power is, on its own, more of an inconvenience than an immediate safety hazard, the underlying cause, a loose or degraded connection somewhere in the circuit, is exactly the kind of fault that can develop into a more serious issue over time, including the heating and fire risks discussed throughout our wiring safety articles. A “dead” socket is sometimes actually a milder symptom of the same type of loose connection that, in a different configuration, might instead present as a hot socket or burning smell rather than simply a loss of power.
Why an Electrician Can Trace This Relatively Quickly
A qualified electrician armed with proper testing equipment can typically trace a radial circuit’s wiring sequence and use continuity and voltage testing to identify exactly where a break or fault has occurred, often considerably faster than trial-and-error guessing. This is one of the clearer cases in residential electrical troubleshooting where professional tools and testing knowledge meaningfully speed up diagnosis compared to visual inspection alone, since the actual fault point is frequently concealed within a wall, junction box, or socket housing not visible without opening it up.
Mapping Your Home’s Sockets Before You Need To
One practical step many homeowners never take until a problem forces the issue: actually mapping which sockets belong to which circuit and breaker, ideally with help from an electrician during a routine visit. Having this map on hand, even something as simple as a labeled diagram or a list taped inside the distribution board’s cover, turns a future “some sockets stopped working” situation from a confusing puzzle into a quick, informed diagnosis, since you’ll already know whether the affected sockets are expected to share a circuit or not. This small investment of time, typically requiring only an hour or so of an electrician’s time during an otherwise routine visit, pays for itself the first time you need to troubleshoot a socket issue under time pressure.
Why Older Properties Are More Prone to This Pattern
Homes with older wiring, particularly properties that have been extended, renovated, or rewired in stages over many years by different contractors, are more likely to develop the kind of degraded connections along a radial circuit’s chain that produce this exact symptom. Connections made decades apart, sometimes using different techniques or materials, and repeated cycles of loading and thermal expansion over many years, all increase the odds that some connection point along an aging circuit eventually loosens or fails. If your property falls into this category and you experience this pattern, it’s worth mentioning the property’s wiring history to your electrician, since it can meaningfully inform where they focus their investigation first.
What to Do While You Wait for an Electrician
In the period between noticing dead sockets and having them properly diagnosed, it’s reasonable to simply avoid relying on the affected sockets rather than attempting any workaround like forcing plugs in more firmly or using adapters to bypass the issue. Continuing to use the working sockets normally is generally fine, since, as noted above, they remain electrically unaffected by whatever is happening downstream; the priority is simply not to delay having the actual fault properly diagnosed and repaired once you’ve noticed the pattern.
Ring vs Radial Circuits and Why the Distinction Matters Here
As covered more fully in our dedicated radial vs ring circuit article, some electrical systems use ring circuits, where sockets are wired in a continuous loop back to the distribution board rather than a simple chain, offering a degree of built-in redundancy: a single break in a true ring circuit doesn’t necessarily cut power to any socket, since current can still reach every point via the other direction around the loop. Most Nigerian residential installations use radial rather than ring circuits, which is exactly why the “some sockets work, some don’t” pattern discussed throughout this article is such a common and recognizable symptom here specifically; in a genuine ring circuit, the same underlying fault would more likely present as a milder symptom (like reduced capacity) rather than a clean, total loss of power to only the downstream portion.
What This Pattern Reveals About Renovation and Extension Work
Homes that have had sockets added or circuits extended after the original wiring was completed, common in properties that have grown or been renovated over time, sometimes have connection points added specifically at the joint between original and newer wiring. These added connection points, if not executed to a high standard, are a common location for the kind of break or fault discussed throughout this article, making renovation history another useful piece of context to share with an electrician investigating a “some sockets work, some don’t” pattern in a home that has been modified since its original construction.
Common Misconceptions
- “If the breaker hasn’t tripped, all sockets on that circuit should be working.” A break or fault partway along a radial circuit’s chain can cut power to downstream sockets without necessarily tripping the breaker at all.
- “Dead sockets are always due to a serious wiring problem.” Sometimes the cause is as simple as a socket being switched off at a wall switch, or a device itself being faulty rather than the socket.
- “It’s fine to just avoid using dead sockets indefinitely without investigating.” The underlying cause can worsen or indicate a developing issue elsewhere in the same circuit, worth identifying rather than simply working around permanently.
Frequently Asked Questions
Can I test whether a socket has power using a simple device?
A basic plug-in socket tester, inexpensive and widely available, can confirm whether a socket has power and, in many cases, indicate basic wiring faults, though it does not replace proper professional diagnosis for genuine faults.
Does this pattern always mean a radial circuit fault?
It’s the most common explanation given typical Nigerian wiring practice, but confirming your specific home’s circuit topology and layout with an electrician is the reliable way to know for certain rather than assuming.
Is it safe to keep using the working sockets while the dead ones are unaddressed?
Generally yes, since the working sockets are, by definition, still receiving power normally, though having the underlying cause diagnosed and repaired promptly remains the better long-term approach.
Final Thoughts
Some sockets working while others don’t is rarely a mystery once you understand how radial circuit wiring actually works: it’s usually a clear signal of a break or fault at a specific point along that circuit’s chain. Approaching the problem methodically, starting with the obvious and working through to a professional trace if needed, turns a confusing symptom into a solvable, diagnosable problem.