
A multimeter is the single most useful tool an electrician, technician, or curious homeowner can own, yet many people buy one, glance at the confusing dial, and quietly put it back in the drawer. This guide walks you through exactly what a multimeter does, how to set it up safely, and how to take your first voltage, resistance, and current readings with confidence.
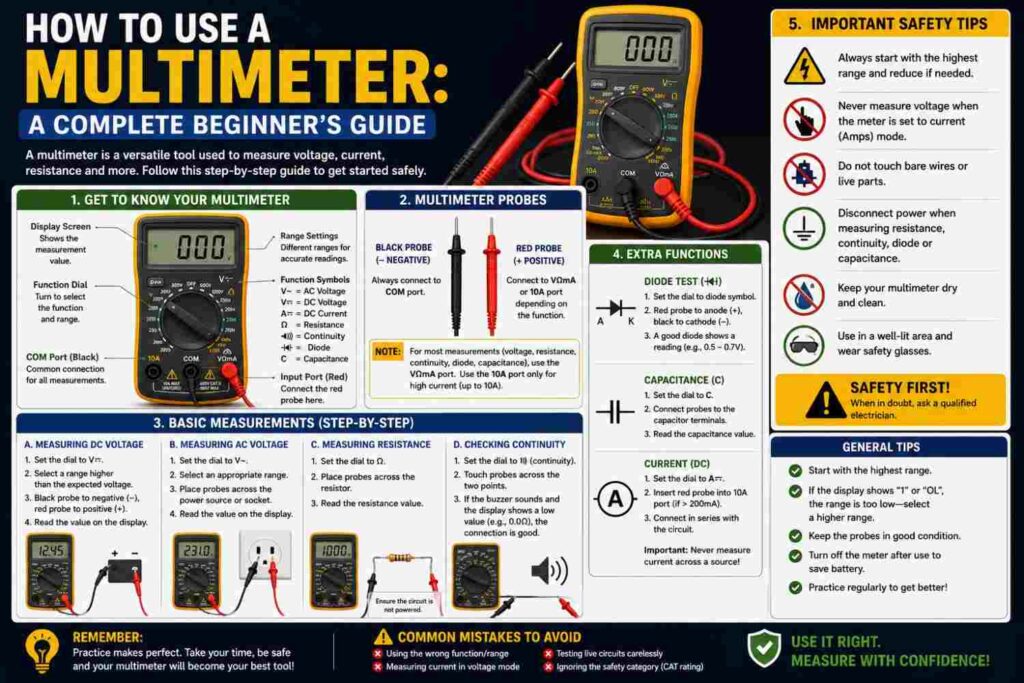
What a Multimeter Actually Measures
At its core, a multimeter combines three instruments into one handheld device: a voltmeter for measuring voltage, an ohmmeter for measuring resistance, and an ammeter for measuring current. Most modern meters add extra functions such as continuity testing, diode testing, capacitance measurement, and sometimes frequency or temperature. Whether you are checking if a wall socket is live, testing a battery, or confirming a wire is not carrying current before you touch it, the multimeter is the tool that gives you the actual numbers instead of a guess.
Analog vs Digital Multimeters
Older analog multimeters use a moving needle across a printed scale, which takes practice to read accurately and is easy to damage with an overload. Digital multimeters (DMMs) display readings as numbers on an LCD screen, are far more forgiving for beginners, and are what almost every technician in Nigeria now carries. A decent digital multimeter costs roughly 5,000 to 25,000 naira locally, with auto-ranging models costing more but removing the need to guess the correct range before measuring.
Getting to Know the Dial, Ports, and Probes
Every multimeter has a central dial or set of buttons to select the function, two or three input ports, and two probes, one black and one red. The black probe always goes into the port marked COM. The red probe moves depending on what you are measuring: usually a port marked VΩ for voltage and resistance, and a separate port, often marked A or mA, for current. Plugging the red probe into the wrong port, especially the current port while measuring voltage, is one of the most common ways beginners damage a meter or blow its internal fuse.
How to Measure Voltage Step by Step
Voltage is the measurement most people start with, since it tells you whether a socket, wire, or battery is live and roughly how much electrical pressure is present. Nigerian household sockets carry 230V to 240V single-phase AC, so always select the AC voltage setting when testing wall outlets, and never touch the metal tips of the probes while they are in contact with a live circuit.
- Set the dial to AC voltage (marked V with a wavy line) for mains sockets, or DC voltage (marked V with a straight line) for batteries and electronics.
- Select a range higher than the voltage you expect, or use auto-range if your meter has it.
- Insert the black probe into COM and the red probe into the VΩ port.
- Touch the probes to the two points you want to measure, without letting your fingers touch the metal tips.
- Read the value on the display, and adjust the range down if the reading is too small to read clearly.
How to Measure Resistance and Continuity
Resistance measurement, shown in ohms, tells you how much a component or wire resists current flow, and it must only be done on a circuit that is completely powered off. Set the dial to the ohm symbol (Ω), touch the probes across the component, and read the value. Continuity mode, usually marked with a sound wave symbol, is a simplified version of this that beeps when there is an unbroken path between two points, which is covered in much more depth in our dedicated continuity testing article for checking wiring, fuses, and switches.
How to Measure Current Safely
Current measurement, in amps, is the one beginners get wrong most often because, unlike voltage, the meter must be connected in series with the circuit, meaning the circuit has to be broken open and the meter inserted into that break. This is riskier and less needed for everyday checks; for most day-to-day work, voltage and continuity testing, plus a clamp meter for current, discussed in our dedicated clamp meter comparison article, cover nearly everything without opening circuits directly.
Quick Reference: Common Multimeter Settings
| Symbol on Dial | What It Measures | Typical Use |
|---|---|---|
| V with wavy line (ACV) | AC Voltage | Wall sockets, generator output |
| V with straight line (DCV) | DC Voltage | Batteries, inverters, electronics |
| Ω | Resistance | Resistors, heating elements, fuses |
| Sound wave symbol | Continuity | Checking unbroken wiring paths |
| A or mA | Current | Circuit current draw (in series) |
Basic Safety Habits Every Beginner Should Build
Always inspect your probes and leads for cracks or exposed wire before use, and isolate power first whenever possible. Keep one hand behind your back or in your pocket when testing live circuits as extra precaution against current passing through your chest. A meter rated for the category of work you do, generally CAT III for household distribution boards, matters more than price, since a cheap uncategorized meter can fail dangerously under a fault. These habits, along with the wiring basics discussed in our dedicated cable sizing article, form the foundation of safe hands-on electrical work.
Common Misconceptions
- “Any multimeter can safely test mains power.” Only meters with an appropriate CAT safety rating for the voltage and environment should be used on household or higher power circuits.
- “If the screen shows a number, the reading must be accurate.” A meter set to the wrong function or range, or with a blown internal fuse, can still display a misleading number.
- “You can measure current the same way you measure voltage, by touching the probes across the two points.” Current measurement requires breaking the circuit and connecting the meter in series, unlike voltage which is measured in parallel.
Frequently Asked Questions
What is the safest first measurement for a beginner to practice?
Measuring the voltage of a standard AA or 9V battery on the DC voltage setting is a safe, low-risk way to get comfortable with the probes and display before moving to mains circuits.
Why does my multimeter show no reading at all?
Check that the probes are in the correct ports, the dial is on the right function, the battery inside the meter is not dead, and that the internal fuse has not blown from a previous overload.
Can I leave the multimeter on the current setting after use?
No, always return the dial to voltage or off after measuring current, since leaving it on the current setting risks a short circuit and blown fuse the next time you accidentally test a voltage source.
Final Thoughts
A multimeter is not complicated once you understand that it is really three tools in one, each requiring the correct dial setting and probe placement. Start with simple, low-risk voltage and continuity checks, build good safety habits from day one, and the confusing dial will quickly become second nature. With practice, this single, affordable tool will let you diagnose most everyday electrical problems yourself instead of guessing or calling a technician for issues you can safely check on your own.