
When a socket stops working, a light won’t switch on, or an appliance seems dead despite having power available nearby, the culprit is often a broken connection somewhere along the wire rather than a faulty appliance itself. Continuity testing with a multimeter is the fastest way to confirm whether a wire, fuse, or switch actually completes an unbroken electrical path.
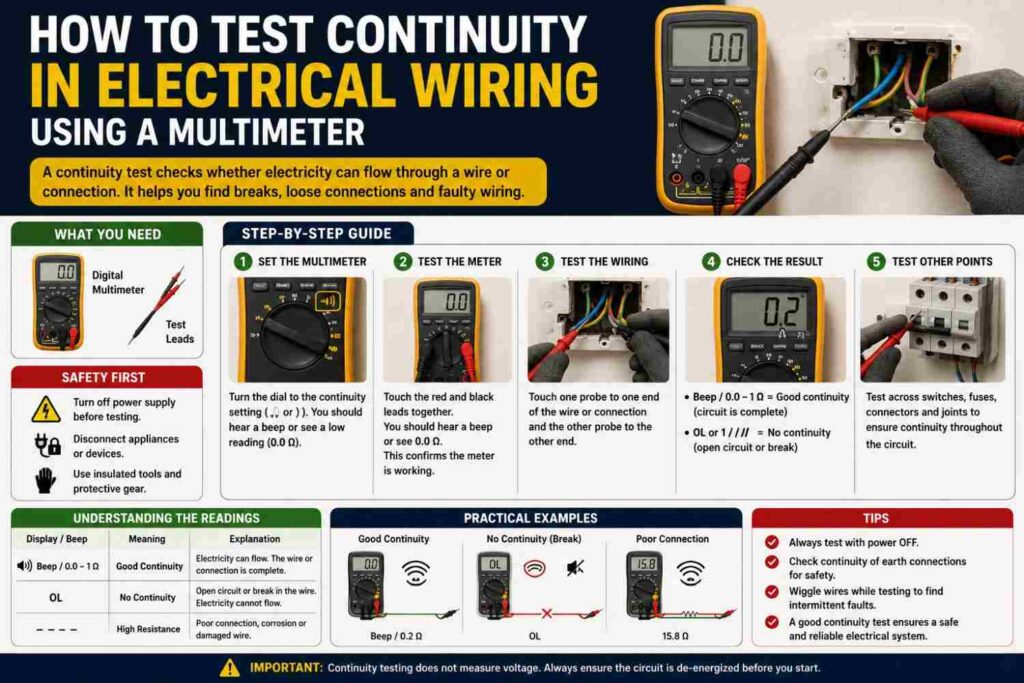
This guide covers exactly how to perform continuity tests safely and interpret what the results mean.
What Continuity Testing Actually Checks
Continuity refers to whether an unbroken, low-resistance path exists between two points in a circuit. A continuity test sends a small current through your probes and either beeps or shows a near-zero resistance reading if the path is complete, or shows no beep and an open/infinite reading if the path is broken. This makes it ideal for finding cut or corroded wires, confirming a switch is functioning, checking whether a fuse has blown, and verifying a cable run from one end to the other before it is installed inside walls or trunking.
Essential Safety Step: Always De-Energize First
Continuity testing must only ever be performed on a circuit with power completely disconnected, since the multimeter sends its own small test current through the circuit and an external live voltage can damage the meter or give a false, unreliable reading. Switch off the relevant breaker at the distribution board, and where possible, verify the circuit is dead using the voltage measurement techniques discussed in our dedicated multimeter guide before starting a continuity check.
Step-by-Step Continuity Testing Procedure
- Switch off power to the circuit at the breaker and confirm it is de-energized with a voltage test.
- Set your multimeter dial to the continuity setting, usually marked with a sound wave or diode symbol.
- Insert the black probe into COM and the red probe into the VΩ port.
- Touch the two probe tips together briefly to confirm the meter beeps, verifying it is working correctly.
- Touch one probe to each end of the wire, switch terminal, or fuse you want to test.
- Listen for the beep (continuity present) or watch for an “OL” or infinite reading (no continuity, meaning a break).
Testing a Length of Wire or Cable Run
To test a wire running through a wall or conduit, disconnect both ends from the circuit, then touch one probe to each end of the same conductor. A beep confirms the wire is intact along its entire length; silence indicates a break somewhere inside, which usually means the cable needs to be replaced rather than repaired mid-run. This same principle applies when testing extension cables and appliance cords for hidden internal breaks that cause intermittent power loss.
Testing Switches and Sockets
A switch should show continuity (a beep) when in the “on” position and no continuity when “off.” Testing this with the switch disconnected from the circuit and isolated confirms whether a faulty switch, rather than the wiring or the appliance, is the actual cause of a dead light or socket. This targeted approach avoids unnecessarily replacing good wiring, sockets, or appliances discussed in our dedicated appliance troubleshooting article, when the real fault is a single cheap switch.
Quick Reference: What Your Reading Means
| Test Result | Meaning | Likely Next Step |
|---|---|---|
| Continuous beep, near-zero ohms | Unbroken path exists | Component/wire is good |
| No beep, “OL” or infinite reading | Path is broken | Wire cut, fuse blown, or switch faulty |
| Intermittent beep when wire is moved | Partial or loose connection | Check terminals and joints for looseness |
| Very low but non-zero resistance | Corroded or degraded connection | Clean or replace the connection point |
Where Continuity Testing Fits Into Wider Diagnosis
Continuity testing is usually one step in a broader diagnostic process rather than a complete answer on its own. If a circuit shows good continuity throughout but still doesn’t work, the fault may lie elsewhere, such as a tripped RCD or earth leakage device, covered in our dedicated RCD article, or an issue back at the main distribution panel. Combining continuity checks with voltage testing at each stage of a circuit gives a far more complete picture than either test alone.
Common Misconceptions
- “Continuity testing can be done on a live circuit for a quicker check.” Testing continuity on a live circuit gives unreliable results and can damage the multimeter, so power must always be off first.
- “A beep always means the wire is in perfect condition.” A beep only confirms a path exists; it does not rule out a partially corroded or high-resistance connection that could still cause problems under load.
- “Continuity and voltage testing tell you the same thing.” Continuity confirms a physical unbroken path with power off, while voltage testing confirms actual electrical pressure is present with power on; they answer different questions.
Frequently Asked Questions
Can continuity testing damage my multimeter if the circuit is actually live?
Yes, testing continuity on an energized circuit can send unexpected current back into the meter and potentially damage it or blow its internal fuse.
Why does my continuity test give inconsistent results on the same wire?
This usually points to a loose or corroded connection somewhere along the path, where slight movement of the wire makes or breaks the contact intermittently.
Can I use continuity mode to test a fuse without removing it from the circuit?
It is best to remove the fuse first, since testing it while still connected can give a false reading through other parallel paths in the circuit, similar to testing components while still wired in.
Final Thoughts
Continuity testing is one of the simplest and most reliable diagnostic checks a multimeter offers, turning a vague “something’s not working” into a clear yes-or-no answer about a specific wire, switch, or fuse. Always de-energize the circuit first, confirm your meter is working with a quick probe-tip test, and work through the circuit systematically from one likely fault point to the next. Master this one skill and you will resolve a large share of everyday household wiring problems without needing to call in outside help.